Tuesday, October 9, 2012

Surgery Hats: A Step by Step Primer

Here is a sampling of 25 Surgery Hats.  There is always a variety of designs. 
It is an ongoing project that the church began several years ago.  We try to have 100 surgery hats each month for the DeVos Children's Hospital Surgery Unit.  One of the nurses in that unit approached me about helping with this, and I jumped at the opportunity to make a difference in a child's life. 

The reason for the hats?  A child does not have a choice if they want suregery or not.  Being able to choose what hat to wear offers a child some control over one small decision.  That can give a child comfort in a difficult and scary time.


These hats are very easy to make and average under $1.00 each. 


The first step is picking the fabric.  This is one of my favorite parts.  We make the hats from flannel, which is a softer and warmer fabric.  The operating rooms are kept cool.  We try to stay away from anything controversial--skulls and peace signs, as it is best not to offend anyone in this process.  Then we look for fabrics for boys, and some for girls, some that all kids will like, some for younger and older kids. 


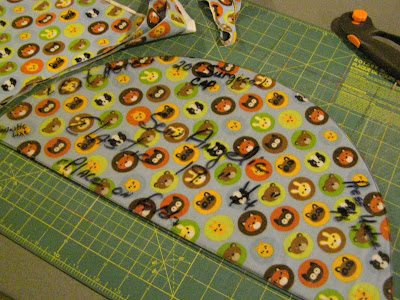
First the fabric is folded parallel to the selvage edge- four layers, two folds. 


Then, using a plastic template and a rotary cutter, we cut the 20" circle from the fabric.  The radius of the circle is placed on the folded edge of the fabric.  Using the rotary cutter, cut the round edge of the template.  Each cut makes two circles.  Then we fold and stack it to get ready for the next step.


Next the fabric edge is serged.  We adjust the needle tensions a little tighter to allow the fabric to gather.  This eases the edge in so when the casing is sewn, the fabric will lay flat.


Without this step, the fabric casing would be full of folds.  This step also finishes the edge of the fabric so that it will not ravel.  We leave a tail of thread at the end of the serging to make the open area when doing the casing.

Fold over 5/8 inch and stitch it down to make the casing.  We use a zig-zag stitch and stitch over the serged edge.  It makes it easier to stay near the edge without waivering off the edge.  Begin sewing at the serged "tail."  Stop about 1/2 inch before the "tail."  This opening will be large enough to insert the elastic.


It is important at this point to iron the hat.  No one wants to give a hat that has creases and wrinkles in the fabric from being rolled on the bolt at the factory.  We spray the hat with water using a small spray bottle.  The press firmly with an iron heated to the cotton setting. 


Cut a piece of 1/4 inch elastic 19-1/2 inches long.


Insert in a bodkin, and tighten it securely.  Using the bodkin, insert the elastic into the casing. 


When about halfway through, pin the loose end of the elastic at the opening.  This will prevent the end from coming through the casing so that you have to start again.  Continue threading the elastic through until the bodkin can be pushed through the opening.


Carefully remove the pin, pulling the elastic about 2 inches out of the casing.  WIth a two inch piece of elastic before the bodkin, remove the bodkin.  Take the two ends of the elastic and overlap them.  Secure with a pin.


Place the elastic with the pin still in it, under the pressure foot of the sewing machine.  Rotate the needle down into the elastic and then, remove the pin. Zig-zag back and forth a few times, until the elastic is very secure.  Remove from under the foot and cut the elastic. 


Turn the hat to the outside.  Beginning an inch or so from the opening (unstitched area) stitch the opening closed lining up the stitches with the existing stitches for the casing.  Continue sewing about one inch past the opening, stiching over exisating stitches.  This will secure the opening so the stitches will not come undone.  Trim all of the loose threads from the inside and outside of this area. 


Even the gathers around the edge of the hat and flatten it.  Your surgery hat is complete.  Pretty Easy!

We package the hat for the hospital by folding in thirds and then in half and insert them in a ziplock sandwich bag.  Then we add a snall card that says that this was made for them by the Anchor Baptist Church in partnership with Kohl's Cares for Kids.

Other surgery centers would love to have hats like this for the children who are getting surgery.  If you are interested in doing something like this, please contact me, or your local center that may want to have hats like these.  Even if you only did this for special holidays or occasionally, I know that there are places who would appreciate the caring donation.


Friday, September 14, 2012

Monk's Garb for the Renaissance Fair

Custom Renaissance Costuming. . . . Did I hang out a shingle?  I no sooner finished Joe's Steam Punk Costume for the Renaissance Fair and I got another request.  Kidding, of course!  I love a challenge . . . and I love to sew.   
Simplicity 5840

So Chris and I went shopping with a basic idea of what he wanted this costume to look like.  We found a pattern to use as a jumping off spot.  There were several modifications necessary to make this costume what he was looking for. 
 
       The pattern was an open cloak.  Not what we were   looking for although it was the right size.  So with changes to the basic pattern we ended up with a traditional Monk's costume.


      A removable cape made the look change up from a peasant look.  We did not want the cape to open in the front or to be too "ruffled."


      Chris wanted the white overlay with a cross, which I had no pattern for.  It was kind of a sketch and a guess, and turned out quite well, I think.


      And wearing a robe like this makes you wonder how your get to your phone, your wallet, your keys . . . .  So we put velcro pockets inside both sleeves.  They are attached at the sleeve seam so they hide themselves well and allow for easy access when needed.


      Any costume can be made and look good.  But the wearer makes the costume.  And Chris is the perfect person for this costume.  You might think it was made for him!!


    Saturday, September 8, 2012

    Steam Punk Costume

    Joseph drew it.  Patiently waiting to get to the top of my "To Do List," it finally came to the typical dilemna.  It is for tomorrow.  So, for the first time in many years (I think I have only done this one other time), I pulled an all nighter.  It was not that it was so hard.  Mostly, it was getting the idea from drawing to fabric. 
    Joseph - trying on the costume for the first time.
    It began long ago.  But it did not have this in mind when it began.  I think we decided it was eight or more years ago when Joseph and Deb cut out this black coat.   This was before any of the three of us were gluten free.  I had my priorities and Joseph had his.  I did not have time to start another project.  Back then, I was working . . . . Anyhow, although the coat was cut out, it never got really started.  It ended up in the pile of Good Intentions.

    When Joseph started talking to me about this coat, I had just come across this original project and decided we would see if it could be adapted for this coat.  It was cut out as XS.  Well, Joseph is no longer XS.  He measured a Large.  First Challenge.  Is there enough fabric to make it fit?

    And, Second Challenge, they kind of followed the pattern when they cut it out, making a few changes to the sleeves and collar. 

    Seam allowances are all down to 1/4 inch.  It looks like it should fit.  It is a much more fitted style than the original pattern.

    So, we added a cape-like piece like Shelock Holmes.  He called it something else, but you get the idea.  Of course, with no pattern piece . . . Third Challenge.

    Zip off sleeves and gold topstiching.
    The cape is filled up to show the sleeves.
     Next, there were zip off sleeves.  I had never done this before but, using separating zippers, a pretty easy step.  And the gold zippers were a nice design line.  On the front tabs, there are three gold stitching lines for design.  I used two threads through the same needle to get a nice dark gold line. 

    The buttons were a great find.  We stole them off another coat.  Could not find what we wanted to purchase and it sure was economical to find the right buttons on an unused coat. 

    Like any great project, there was a lot of talk back and forth on this one. Challenge Four.  So, do we want buttons on both ends of the tabs?  We had enough buttons to do it.  Yes, The final decision on Wednesday was to do the double breasted look.  By Thursday, I decided that it did not make sense to change what we were doing.  We loved the original look, and this change was not it.  So, back to the drawing board of the original design - And so much better!

    You can see that we also cut away the front piece below the waist/belt and added zipper trim.  It actually could zip but for no purpose. 


    Then, there was the glove project.  Joseph wanted one fingerless glove and this "leather" wrap that connected with straps.  Challenge Five.  How do you do this???  Trial one glove was too small.  So, how big do you cut a glove pattern out of ribbing to be able to sew it, turn it, and get it on the hand when it is done. 

    The sleeves were supposed to have large hook and eyes to connect the straps.  Not for today!  That is hand work that will have to wait.  There is a second glove, waiting to be finished and the second sleeve, too.  They were not needed for the debut of the costume, so they will go on next week's list.

    Then there are spats.  Challenge Six.  This was not the most fun, and yet . . . we will probably make more.  This is made from pleather, and has Bachelor Buttons down the side.  Joe put the snaps on in the morning as I was sewing the buttons on the coat. 

    As you can see in the pictures above, Joe's part of the costume was more complex than mine as he created the armor for the left arm.

    The goggles add just the right touch - almost like a bowtie on the tux shirt. 

     Loved the total look!  My son is very creative.  Now it is time to teach him to sew!!!