 |
| Here is a sampling of 25 Surgery Hats. There is always a variety of designs. |
The reason for the hats? A child does not have a choice if they want suregery or not. Being able to choose what hat to wear offers a child some control over one small decision. That can give a child comfort in a difficult and scary time.
These hats are very easy to make and average under $1.00 each.

 The first step is picking the fabric. This is one of my favorite parts. We make the hats from flannel, which is a softer and warmer fabric. The operating rooms are kept cool. We try to stay away from anything controversial--skulls and peace signs, as it is best not to offend anyone in this process. Then we look for fabrics for boys, and some for girls, some that all kids will like, some for younger and older kids.
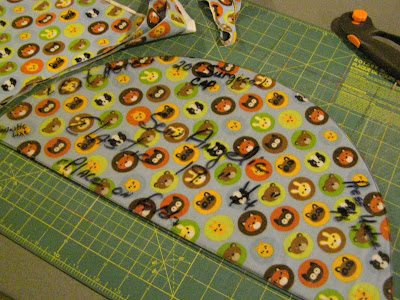
 First the fabric is folded parallel to the selvage edge- four layers, two folds.

Then, using a plastic template and a rotary cutter, we cut the 20" circle from the fabric. The radius of the circle is placed on the folded edge of the fabric. Using the rotary cutter, cut the round edge of the template. Each cut makes two circles. Then we fold and stack it to get ready for the next step.
 |


 Next the fabric edge is serged. We adjust the needle tensions a little tighter to allow the fabric to gather. This eases the edge in so when the casing is sewn, the fabric will lay flat.
Without this step, the fabric casing would be full of folds. This step also finishes the edge of the fabric so that it will not ravel. We leave a tail of thread at the end of the serging to make the open area when doing the casing.
Fold over 5/8 inch and stitch it down to make the casing. We use a zig-zag stitch and stitch over the serged edge. It makes it easier to stay near the edge without waivering off the edge. Begin sewing at the serged "tail." Stop about 1/2 inch before the "tail." This opening will be large enough to insert the elastic.

It is important at this point to iron the hat. No one wants to give a hat that has creases and wrinkles in the fabric from being rolled on the bolt at the factory. We spray the hat with water using a small spray bottle. The press firmly with an iron heated to the cotton setting.

Cut a piece of 1/4 inch elastic 19-1/2 inches long.

Insert in a bodkin, and tighten it securely. Using the bodkin, insert the elastic into the casing.

When about halfway through, pin the loose end of the elastic at the opening. This will prevent the end from coming through the casing so that you have to start again. Continue threading the elastic through until the bodkin can be pushed through the opening.

Carefully remove the pin, pulling the elastic about 2 inches out of the casing. WIth a two inch piece of elastic before the bodkin, remove the bodkin. Take the two ends of the elastic and overlap them. Secure with a pin.
Place the elastic with the pin still in it, under the pressure foot of the sewing machine. Rotate the needle down into the elastic and then, remove the pin. Zig-zag back and forth a few times, until the elastic is very secure. Remove from under the foot and cut the elastic.

Turn the hat to the outside. Beginning an inch or so from the opening (unstitched area) stitch the opening closed lining up the stitches with the existing stitches for the casing. Continue sewing about one inch past the opening, stiching over exisating stitches. This will secure the opening so the stitches will not come undone. Trim all of the loose threads from the inside and outside of this area.
Even the gathers around the edge of the hat and flatten it. Your surgery hat is complete. Pretty Easy!
We package the hat for the hospital by folding in thirds and then in half and insert them in a ziplock sandwich bag. Then we add a snall card that says that this was made for them by the Anchor Baptist Church in partnership with Kohl's Cares for Kids.
Other surgery centers would love to have hats like this for the children who are getting surgery. If you are interested in doing something like this, please contact me, or your local center that may want to have hats like these. Even if you only did this for special holidays or occasionally, I know that there are places who would appreciate the caring donation.


No comments:
Post a Comment